Testing Odoo
There are many ways to test an application. In Odoo, we have three kinds of tests
Python unit tests (see Testing Python code): useful for testing model business logic
JS unit tests (see Testing JS code): useful to test the javascript code in isolation
Tours (see Integration Testing): tours simulate a real situation. They ensures that the python and the javascript parts properly talk to each other.
Testing Python code
Odoo provides support for testing modules using unittest.
To write tests, simply define a tests sub-package in your module, it will
be automatically inspected for test modules. Test modules should have a name
starting with test_ and should be imported from tests/__init__.py,
e.g.
your_module
|-- ...
`-- tests
    |-- __init__.py
    |-- test_bar.py
    `-- test_foo.py
and __init__.py contains:
from . import test_foo, test_bar
警告
test modules which are not imported from tests/__init__.py will not be
run
The test runner will simply run any test case, as described in the official unittest documentation, but Odoo provides a number of utilities and helpers related to testing Odoo content (modules, mainly):
By default, tests are run once right after the corresponding module has been installed. Test cases can also be configured to run after all modules have been installed, and not run right after the module installation:
The most common situation is to use
TransactionCase and test a property of a model
in each method:
class TestModelA(common.TransactionCase):
    def test_some_action(self):
        record = self.env['model.a'].create({'field': 'value'})
        record.some_action()
        self.assertEqual(
            record.field,
            expected_field_value)

    # other tests...
注解
Test methods must start with test_
Running tests
Tests are automatically run when installing or updating modules if
--test-enable was enabled when starting the
Odoo server.
Test selection
In Odoo, Python tests can be tagged to facilitate the test selection when running tests.
Subclasses of odoo.tests.common.BaseCase (usually through
TransactionCase,
SavepointCase or
HttpCase) are automatically tagged with
standard and at_install by default.
Invocation
--test-tags can be used to select/filter tests
to run on the command-line. It implies --test-enable,
so it’s not necessary to specify --test-enable
when using --test-tags.
This option defaults to +standard meaning tests tagged standard
(explicitly or implicitly) will be run by default when starting Odoo
with --test-enable.
When writing tests, the tagged() decorator can be
used on test classes to add or remove tags.
The decorator’s arguments are tag names, as strings.
危险
tagged() is a class decorator, it has no
effect on functions or methods
Tags can be prefixed with the minus (-) sign, to remove them instead of
add or select them e.g. if you don’t want your test to be executed by
default you can remove the standard tag:
from odoo.tests import TransactionCase, tagged

@tagged('-standard', 'nice')
class NiceTest(TransactionCase):
    ...
This test will not be selected by default, to run it the relevant tag will have to be selected explicitly:
$ odoo-bin --test-tags nice
Note that only the tests tagged nice are going to be executed. To run
both nice and standard tests, provide multiple values to
--test-tags: on the command-line, values
are additive (you’re selecting all tests with any of the specified tags)
$ odoo-bin --test-tags nice,standard
The config switch parameter also accepts the + and - prefixes. The
+ prefix is implied and therefore, totally optional. The - (minus)
prefix is made to deselect tests tagged with the prefixed tags, even if they
are selected by other specified tags e.g. if there are standard tests which
are also tagged as slow you can run all standard tests except the slow
ones:
$ odoo-bin --test-tags 'standard,-slow'
When you write a test that does not inherit from the
BaseCase, this test will not have the default tags,
you have to add them explicitly to have the test included in the default test
suite. This is a common issue when using a simple unittest.TestCase as
they’re not going to get run:
import unittest
from odoo.tests import tagged

@tagged('standard', 'at_install')
class SmallTest(unittest.TestCase):
    ...
Besides tags you can also specify specific modules, classes or functions to
test. The full syntax of the format accepted by --test-tags
is:
[-][tag][/module][:class][.method]
So if you want to test the stock_account module, you can use:
$ odoo-bin --test-tags /stock_account
If you want to test a specific function with a unique name, it can be specified directly:
$ odoo-bin --test-tags .test_supplier_invoice_forwarded_by_internal_user_without_supplier
This is equivalent to
$ odoo-bin --test-tags /account:TestAccountIncomingSupplierInvoice.test_supplier_invoice_forwarded_by_internal_user_without_supplier
if the name of the test is unambiguous. Multiple modules, classes and functions
can be specified at once separated by a , like with regular tags.
Examples
重要
Tests will be executed only in installed modules. If you’re starting from
a clean database, you’ll need to install the modules with the
-i switch at least once. After that it’s no longer
needed, unless you need to upgrade the module, in which case
-u can be used. For simplicity, those switches are
not specified in the examples below.
Run only the tests from the sale module:
$ odoo-bin --test-tags /sale
Run the tests from the sale module but not the ones tagged as slow:
$ odoo-bin --test-tags '/sale,-slow'
Run only the tests from stock or tagged as slow:
$ odoo-bin --test-tags '-standard, slow, /stock'
注解
-standard is implicit (not required), and present for clarity
Testing JS code
Testing a complex system is an important safeguard to prevent regressions and to guarantee that some basic functionality still works. Since Odoo has a non trivial codebase in Javascript, it is necessary to test it. In this section, we will discuss the practice of testing JS code in isolation: these tests stay in the browser, and are not supposed to reach the server.
Qunit test suite
The Odoo framework uses the QUnit library testing framework as a test runner. QUnit defines the concepts of tests and modules (a set of related tests), and gives us a web based interface to execute the tests.
For example, here is what a pyUtils test could look like:
QUnit.module('py_utils');

QUnit.test('simple arithmetic', function (assert) {
    assert.expect(2);

    var result = pyUtils.py_eval("1 + 2");
    assert.strictEqual(result, 3, "should properly evaluate sum");
    result = pyUtils.py_eval("42 % 5");
    assert.strictEqual(result, 2, "should properly evaluate modulo operator");
});
The main way to run the test suite is to have a running Odoo server, then
navigate a web browser to /web/tests. The test suite will then be executed
by the web browser Javascript engine.
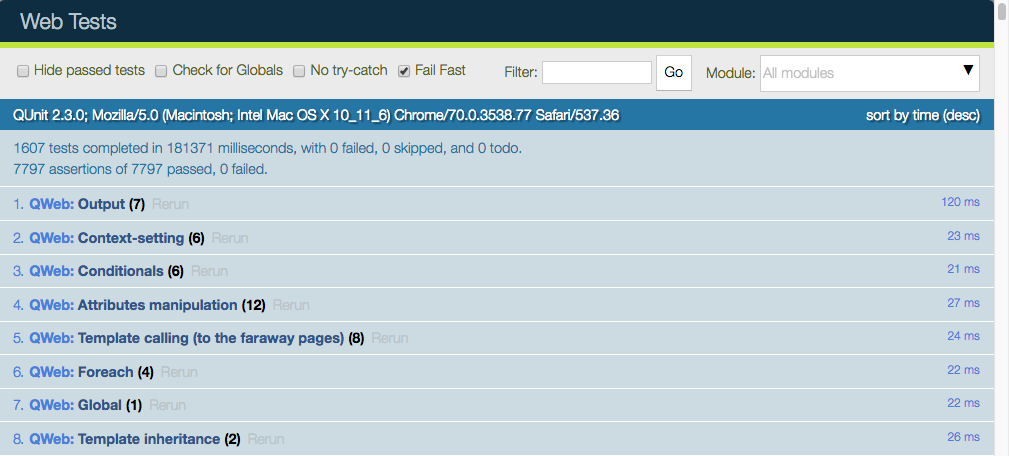
The web UI has many useful features: it can run only some submodules, or filter tests that match a string. It can show every assertions, failed or passed, rerun specific tests, …
警告
While the test suite is running, make sure that:
your browser window is focused,
it is not zoomed in/out. It needs to have exactly 100% zoom level.
If this is not the case, some tests will fail, without a proper explanation.
Testing Infrastructure
Here is a high level overview of the most important parts of the testing infrastructure:
there is an asset bundle named web.js_tests_assets. This bundle contains the main code (assets common + assets backend), some libraries, the QUnit test runner, and some additional helper code
another asset bundle, web.qunit_suite, contains all the tests (and the js_tests_assets code). Almost all the test files should be added to this bundle
there is a controller in web, mapped to the route /web/tests. This controller simply renders the web.qunit_suite template.
to execute the tests, one can simply point its browser to the route /web/tests. In that case, the browser will download all assets, and QUnit will take over.
there is some code in qunit_config.js which logs in the console some information when a test passes or fails.
we want the runbot to also run these tests, so there is a test (in test_js.py) which simply spawns a browser and points it to the web/tests url. Note that the phantom_js method does not spawn phantom_js, but Chrome headless instead.
Modularity and testing
With the way Odoo is designed, any addon can modify the behaviour of other parts of the system. For example, the voip addon can modify the FieldPhone widget to use extra features. This is not really good from the perspective of the testing system, since this means that a test in the addon web will fail whenever the voip addon is installed (note that the runbot runs the tests with all addons installed).
At the same time, our testing system is good, because it can detect whenever another module breaks some core functionality. There is no complete solution to this issue. For now, we solve this on a case by case basis.
Usually, it is not a good idea to modify some other behaviour. For our voip example, it is certainly cleaner to add a new FieldVOIPPhone widget and modify the few views that needs it. This way, the FieldPhone widget is not impacted, and both can be tested.
Adding a new test case
Let us assume that we are maintaining an addon my_addon, and that we want to add a test for some javascript code (for example, some utility function myFunction, located in my_addon.utils). The process to add a new test case is the following:
create a new file my_addon/static/tests/utils_tests.js. This file contains the basic code to add a QUnit module my_addon > utils.
odoo.define('my_addon.utils_tests', function (require) {
"use strict";

var utils = require('my_addon.utils');

QUnit.module('my_addon', {}, function () {

    QUnit.module('utils');

});
});
In my_addon/assets.xml, add the file to the main test assets:
<?xml version="1.0" encoding="utf-8"?>
<odoo>
    <template id="qunit_suite" name="my addon tests" inherit_id="web.qunit_suite">
        <xpath expr="//script[last()]" position="after">
            <script type="text/javascript" src="/my_addon/static/tests/utils_tests.js"/>
        </xpath>
    </template>
</odoo>
Restart the server and update my_addon, or do it from the interface (to make sure the new test file is loaded)
Add a test case after the definition of the utils sub test suite:
QUnit.test("some test case that we want to test", function (assert) {
    assert.expect(1);

    var result = utils.myFunction(someArgument);
    assert.strictEqual(result, expectedResult);
});
Visit /web/tests/ to make sure the test is executed
Helper functions and specialized assertions
Without help, it is quite difficult to test some parts of Odoo. In particular, views are tricky, because they communicate with the server and may perform many rpcs, which needs to be mocked. This is why we developed some specialized helper functions, located in test_utils.js.
Mock test functions: these functions help setting up a test environment. The most important use case is mocking the answers given by the Odoo server. These functions use a mock server. This is a javascript class that simulates answers to the most common model methods: read, search_read, nameget, …
DOM helpers: useful to simulate events/actions on some specific target. For example, testUtils.dom.click performs a click on a target. Note that it is safer than doing it manually, because it also checks that the target exists, and is visible.
create helpers: they are probably the most important functions exported by test_utils.js. These helpers are useful to create a widget, with a mock environment, and a lot of small detail to simulate as much as possible the real conditions. The most important is certainly createView.
qunit assertions: QUnit can be extended with specialized assertions. For Odoo, we frequently test some DOM properties. This is why we made some assertions to help with that. For example, the containsOnce assertion takes a widget/jQuery/HtmlElement and a selector, then checks if the target contains exactly one match for the css selector.
For example, with these helpers, here is what a simple form test could look like:
QUnit.test('simple group rendering', function (assert) {
    assert.expect(1);

    var form = testUtils.createView({
        View: FormView,
        model: 'partner',
        data: this.data,
        arch: '<form string="Partners">' +
                '<group>' +
                    '<field name="foo"/>' +
                '</group>' +
            '</form>',
        res_id: 1,
    });

    assert.containsOnce(form, 'table.o_inner_group');

    form.destroy();
});
Notice the use of the testUtils.createView helper and of the containsOnce assertion. Also, the form controller was properly destroyed at the end of the test.
Best Practices
In no particular order:
all test files should be added in some_addon/static/tests/
for bug fixes, make sure that the test fails without the bug fix, and passes with it. This ensures that it actually works.
try to have the minimal amount of code necessary for the test to work.
usually, two small tests are better than one large test. A smaller test is easier to understand and to fix.
always cleanup after a test. For example, if your test instantiates a widget, it should destroy it at the end.
no need to have full and complete code coverage. But adding a few tests helps a lot: it makes sure that your code is not completely broken, and whenever a bug is fixed, it is really much easier to add a test to an existing test suite.
if you want to check some negative assertion (for example, that a HtmlElement does not have a specific css class), then try to add the positive assertion in the same test (for example, by doing an action that changes the state). This will help avoid the test to become dead in the future (for example, if the css class is changed).
Tips
running only one test: you can (temporarily!) change the QUnit.test(…) definition into QUnit.only(…). This is useful to make sure that QUnit only runs this specific test.
debug flag: most create utility functions have a debug mode (activated by the debug: true parameter). In that case, the target widget will be put in the DOM instead of the hidden qunit specific fixture, and more information will be logged. For example, all mocked network communications will be available in the console.
when working on a failing test, it is common to add the debug flag, then comment the end of the test (in particular, the destroy call). With this, it is possible to see the state of the widget directly, and even better, to manipulate the widget by clicking/interacting with it.
Integration Testing
Testing Python code and JS code separately is very useful, but it does not prove that the web client and the server work together. In order to do that, we can write another kind of test: tours. A tour is a mini scenario of some interesting business flow. It explains a sequence of steps that should be followed. The test runner will then create a phantom_js browser, point it to the proper url and simulate the click and inputs, according to the scenario.
Screenshots and screencasts during browser_js tests
When running tests that use HttpCase.browser_js from the command line, the Chrome browser is used in headless mode. By default, if a test fails, a PNG screenshot is taken at the moment of the failure and written in
'/tmp/odoo_tests/{db_name}/screenshots/'
Two new command line arguments were added since Odoo 13.0 to control this behavior:
--screenshots and --screencasts